
The Complete RytePad User Guide
Everything you need to navigate and make the most of RytePad — from your first task to Pro features like auto-copying tasks and the countdown timer. Designed to boost productivity and support personal reflection.
Introduction to RytePad
RytePad is an all-in-one productivity web app that helps you stay organized and mindful every day.
It brings together a smart task manager for to-dos, a flexible journal for your thoughts, goal trackers for monthly or long-term plans, project-specific checklists, and a quick notepad — everything in one simple, intuitive space.
RytePad syncs seamlessly and works across all your devices.
A subsidiary of MarkSurge — RytePad is operated by our parent company.
Key Features
Getting Started
RytePad is completely free to get started. Create your account in under a minute and start using it right away.
Registration
To begin using RytePad:
- Visit rytepad.com and click the “Sign Up Free” button.
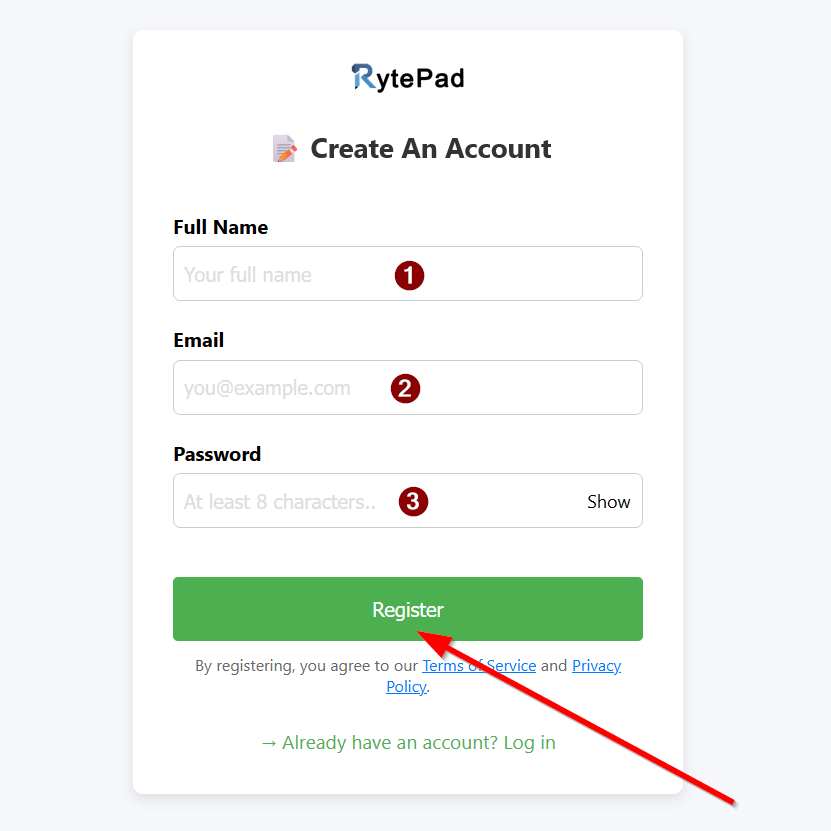
- Enter your information:
- Full Name: Your full name.
- Email: A valid email address.
- Password: At least 8 characters.
- Click “Register” to create your account.
- You will then be automatically logged in and redirected to your dashboard.
- Check your email for a welcome message from RytePad!
Logging In
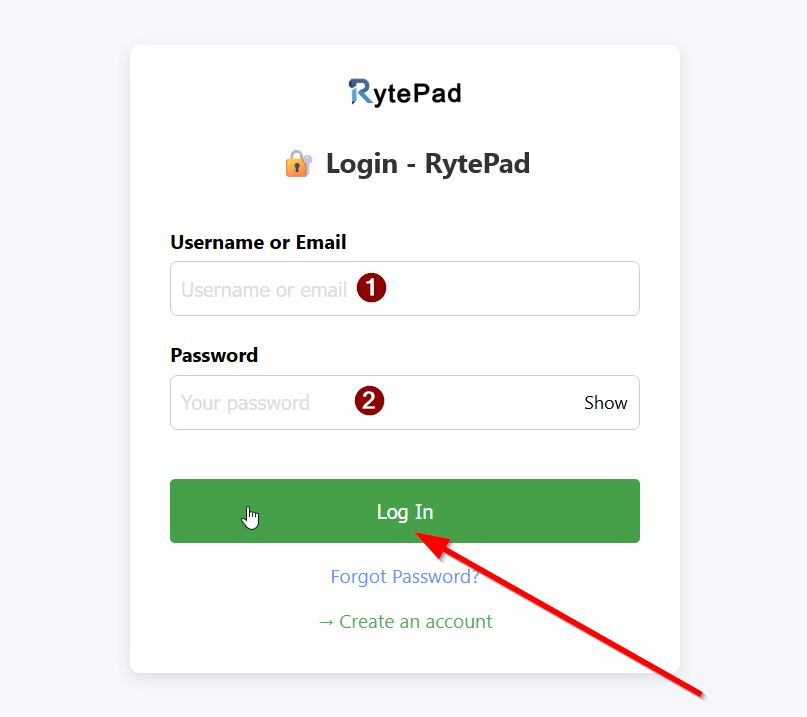
- Go to the RytePad Login page.
- Enter your registered email address or your username (auto-generated during registration).
- Enter your password and click Login.
You’ll be signed in and remain logged in on that device for up to 40 days, thanks to cookies.
Navigating the App
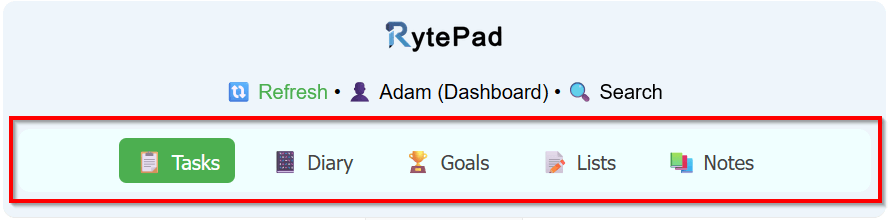
RytePad keeps navigation simple: a header at the top, and one tab per feature at the bottom. Click a tab to switch sections.
- 🔃 Refresh
- 👤 Name (Dashboard)
- 🔍 Search
- 📋 Tasks · 📔 Diary · 🏆 Goals
- 📝 Lists · 📚 Notes
How to Use: Daily Tasks
The “Tasks” section (under the “Tasks” tab) is your go-to for managing daily to-dos. It’s date-based, so tasks are tied to specific days, with sections for Pending and Completed items. Add, edit, complete, or delete tasks with ease.
Free users can create unlimited tasks and track progress with sound effects and calendar dots. Upgrade to Pro for advanced features like automatically carrying over unfinished tasks to the next day & more. For an overview of this feature, see the Daily Tasks & To-Do Lists page.
Accessing the Tasks Section
- Log in to RytePad and open the dashboard.
- In the bottom navigation, click the 📋 Tasks tab (first icon, labeled “Tasks”).
- What you’ll see: Date picker at the top (defaults to today), “Add A Task” input, Pending/Completed sections.
- Sync icon (green disc) flashes during loads/saves.
Adding a New Task
- In the “Add A Task” input, type your to-do (e.g., “Water plants” or “Call doctor” — up to 500 characters max per task).
- Click Add Task.
- What happens: It appears in “Pending Tasks” with icons: 🕒 (pending), ✏️ (edit), ❌ (delete), ✓ (complete).
- Sound: A quick “add” chime plays.
Example: Add “Buy groceries” — it shows up ready to manage. No limits — add as many as needed!
Managing Your Tasks
In Pending Tasks or Completed sections:
- Edit a task: Hover over a pending task and click ✏️. Edit the text, then click “Save” (or “Cancel”).
- Complete a task: Click ✓ (green checkmark). It moves to “Completed ✅” with options: ↩️ (restore), ❌ (delete). A satisfying “complete” tone plays.
- Restore a completed task: Click ↩️ on any completed task to move it back to Pending.
- Delete a task: Click ❌ on any task, then confirm in the popup (permanent delete). A “delete” ping plays.
Switching Dates & Viewing Past Tasks
- Use arrows (‹ ›) for prev/next day, or click the date to open the calendar.
- Pick a date — tasks load automatically.
- Calendar dots: Green dots mark days with tasks (hover to see).
- Relative labels: “Today,” “Yesterday,” etc.
Example: Go to tomorrow to plan ahead, or last week to review. No future limits — pre-plan freely!
Auto-Copying Tasks Pro
Pro feature: Automatically carries over any pending tasks to the next day at midnight (00:00).
Copied tasks get a prefix showing how many days they’ve been carried forward. If your task was “Call an Old Friend” and it wasn’t completed, the next day it appears as “D1|: Call an Old Friend.” If still incomplete the following day, it becomes “D2|: Call an Old Friend.”
Tasks continue copying daily until you mark them complete, or until they reach Day 10 (D10) — after that, they are no longer copied automatically.
Enabling / disabling:
- In your Dashboard (click your name in the header), find “Auto Copy Tasks Next Day.”
- Check the box to enable.
- What happens: Unfinished tasks from today copy to tomorrow automatically (at midnight).
Searching Your Tasks
- Click 🔍 Search (top menu).
- In the “Search Tasks” sub-tab, add text (e.g., “groceries”) and/or dates (start/end).
- Click Search.
- Results: Matches in Pending/Completed, grouped by date (e.g., “31 July 2025”), with search terms highlighted.
- Use “Clear” to reset.
Daily Task Reminders
Daily Pending Tasks Reminders
- Get an evening reminder (via email) of any tasks you didn’t complete during the day.
- Turned on by default.
- To manage: go to your Dashboard → Newsletters and uncheck “Daily Pending Tasks Reminders” to turn it off.
Daily Upcoming Task Reminders
- Add tasks for future dates and get reminded (via email) when the day arrives (at 6:30 AM).
- Turned on by default.
- To manage: go to your Dashboard → Newsletters and uncheck the option next to “Daily Upcoming Task Reminders” to turn it off.
How to Use: Diary
The “Diary” section (under the “Diary” tab) is your personal journal for daily reflections, thoughts, or events. Add timestamped entries with rich formatting (bold, lists, colors) — and Pro users get an extra “Diary Note” for summaries.
Entries are dated, searchable, and editable. Free users have unlimited entries. Learn more on the Daily Journal & Diary page — or, if you're new to journaling, read how to start a daily journal.
Accessing the Diary Section
- Log in to RytePad and open the dashboard.
- In the bottom navigation, click the 📔 Diary tab (second icon, labeled “Diary”).
- What you’ll see: Date picker at the top, “Diary Entries” section (for adding/viewing entries), and a collapsible “Diary Note” (Pro-only; free users see a lock).
- Entries load for today’s date by default.
Adding a Diary Entry
- In the editable box at the bottom (“Write a new entry…”), type your thoughts (supports formatting — see below).
- Click Add Entry.
- What happens: The entry appears above in “Diary Entries” with a timestamp (e.g., “Added: 31 July 2025 • 11:25 IST”).
- Icons: ✏️ (edit), ❌ (delete).
- Length limit of 20,000 characters per entry. You can have multiple entries per day.
Example: Write “Had a great meeting today!” and add — it shows with the current time and timezone.
Formatting Your Diary Entry
While typing in the “Write a new entry…” box:
- Use the toolbar: B (bold), I (italic), U (underline),
S(strikethrough). - Add lists (numbered / bullets), colors (grey / red / blue / green text), yellow highlights.
- Insert lines (─), clear format, undo/redo.
- Toggle spell check (🔤) for error underlines.
Managing Your Diary Entries
- Edit an entry: Hover over an entry and click ✏️. Edit in the box (with toolbar), then click “Save” (or “Cancel”).
- Delete an entry: Click ❌, then confirm in the popup (permanent delete).
Adding a Diary Note Pro
- Click the + button next to “Diary Note” to expand (if collapsed).
- Type your daily reflection in the textarea (plain text, up to 20,000 chars).
- Changes auto-save after 10 seconds, or click Save Note.
- What happens: 💾 icon flashes. The note ties to the selected date.
Example: Summarize your day: “Productive but tiring — need more rest.” It saves with the date.
Switching Dates & Viewing Past Entries
- Use the date picker or arrows (‹ ›) to change days.
- Entries and notes load for that date.
- Calendar dots: Blue dots mark dates with entries (hover to see).
Searching Your Diary
- Go to the 🔍 Search tab.
- Switch to the “Search Diary” sub-tab.
- Enter text and/or dates (start/end).
- Click Search (for entries) or Search Diary Notes (Pro, for notes).
- Results: Matches with dates and highlighted text. Click to jump to that diary date.
- Use “Clear” to reset.
How to Use: Goals
The “Goals” section (under the “Goals” tab) helps you set, track, and achieve your objectives. It has two sub-tabs: Long Goals for big-picture or ongoing targets (like “Save $5k”) and Monthly Goals for time-bound ones (like “Read 2 books this month” — a Pro feature).
Free users get unlimited long goals; monthly goals require Pro. Goals can be marked complete, restored, or deleted. For an overview, see the Goal Tracker page.
Accessing the Goals Section
- Log in to RytePad and go to your dashboard.
- In the bottom navigation, click the 🏆 Goals tab (third icon, labeled “Goals”).
- What you’ll see: Two sub-tabs at the top — “Long Goals” (default) and “Monthly Goals.”
- Under Long Goals: an input for adding goals, plus Pending/Completed sections. Switch tabs by clicking the buttons.
- Pro users: Full access. Free users: Monthly Goals shows a locked message.
Adding a Long-Term Goal
- Stay on the Long Goals sub-tab (active by default).
- In the “Add a Goal” input field, type your goal (e.g., “Learn Spanish” or “Run a marathon” — up to 500 characters max per goal).
- Click Add Goal.
- What happens: The goal appears in “Pending Goals ⌛” with icons: 🕒 (pending), ✏️ (edit), ❌ (delete), ✓ (complete).
- No limits for free users — add as many as you want!
Example: Enter “Travel to Europe” and click “Add Goal.” It’s now trackable.
Managing Your Long-Term Goals
- Edit a goal: Hover over a pending goal and click ✏️. Update the text, then click “Save” (or “Cancel”).
- Complete a goal: Click ✓ (green checkmark) on a pending goal. It moves to “Completed ✅” with options: ↩️ (restore), ❌ (delete). A satisfying “complete goal” tone plays.
- Restore a completed goal: In Completed, click ↩️ — it returns to Pending.
- Delete a goal: Click ❌ on any goal, then confirm in the popup (permanent delete).
Switching to Monthly Goals Pro
- Click the Monthly Goals sub-tab.
- Free users: See a locked message.
- Select a period:
- Use the “Year:” dropdown (defaults to current year).
- Use the “Mo:” dropdown (defaults to current month).
- The section updates to show goals for that month/year.
Example: Pick “2025” and “October” to plan ahead.
Adding a Monthly Goal
- In the “Add a Monthly Goal” input, type your goal (e.g., “Exercise 20 days” — up to 500 characters).
- Click Add Goal.
- What happens: It adds to “Pending Goals ⌛ [Month, Year]” with the same icons as long goals.
- Change year/month to add to different periods.
Example: For September, add “Finish online course.” Switch to October for “Plan vacation.”
Managing Your Monthly Goals
Similar to long goals:
- Edit, complete, restore, or delete using the icons (✏️, ✓, ↩️, ❌).
- Completed goals move to “Completed ✅” and sort by date.
- Switch periods to view/manage goals for other months.
How to Use: Task Lists
The “Lists” section (under the “Lists” tab) is a versatile tool for creating and managing custom task lists — grocery lists, project checklists, or to-dos for specific events. It’s separate from your daily tasks and lets you organize items into reusable, editable collections.
For an overview of this feature, see the Custom Task Lists page.
Accessing the Lists Section
- Log in to your RytePad account and go to the main dashboard.
- Click the 📝 Lists tab (fourth icon, labeled “Lists”).
- What you’ll see: A clean interface with two main boxes at the top:
- Box 1: “Add a List Title” input field and “Add List” button.
- Box 2: “Search & Select Lists…” input field.
- Below that, an explainer section with tips.
Creating a New Task List
- In Box 1 (“Add a List Title”), type a short, descriptive name for your list (e.g., “Grocery List” or “Weekend Chores”).
- Keep it under 32 characters — no semicolons (;) or line breaks allowed.
- Click the Add List button next to the input field.
- What happens: If successful, you’ll see a green “List added. Select below.” message briefly. The new list is now available.
- Error checks: If the name already exists (case-insensitive), you’ll get an error. Free users: an error also shows if you’ve hit the 20-list limit.
Example: Type “Weekly Goals” and click “Add List.” Now it’s ready to select!
Selecting a List to View or Edit
- In Box 2 (“Search & Select Lists…”), the newly added list title pops out automatically. You can also start typing the name (or part of it) to search.
- It auto-filters your lists in a dropdown below.
- If you don’t type anything, click into the box to see all your lists (sorted by creation date, newest first).
- Click a list name from the dropdown to select it.
- What happens: The selected list opens below with: the list title and a “Rename List” button; an “Add a Task to this List” input and “Add Task” button; Pending Tasks ⌛ section (incomplete items); Completed ✅ section (finished items); creation and update dates at the bottom; and a “Delete List” button.
- The explainer text at the bottom disappears once a list is selected.
Adding Tasks to a List
- With a list selected, go to the “Add a Task to this List” input field.
- Type your task (e.g., “Buy milk” or “Call plumber” — up to 500 characters).
- Click Add Task.
- What happens: The task appears in the “Pending Tasks ⌛” section with icons: 🕒 (pending), ✏️ (edit), ❌ (delete), ✓ (complete).
- Repeat to add more tasks.
Example: For a “Grocery List,” add “Apples,” “Bread,” and “Cheese.” They’ll show up under Pending.
Managing Your Tasks
- Edit a task: Hover over a pending task and click ✏️ (pencil icon). Edit the text in the popup box, then click “Save” (or “Cancel” to discard).
- Complete a task: Click ✓ (green checkmark) on a pending task. It moves to “Completed ✅” with a green ✓ and options to ↩️ (restore) or ❌ (delete).
- Restore a completed task: In the Completed section, click ↩️ (undo arrow) — it moves back to Pending.
- Delete a task: Click ❌ on any task (pending or completed), then confirm the deletion in the popup. Note: this is permanent — no undo!
Renaming or Deleting a List
- Rename: Next to the list title, click Rename List. Edit the name in the input field (same rules: under 32 chars, no semicolons), then click “Save” (or “Cancel”).
- Delete: At the bottom of the selected list, click Delete List and confirm in the popup — this deletes the list and all its tasks permanently.
Searching Your Lists
- Switch to the 🔍 Search tab (top navigation).
- Go to the “Search Lists” sub-tab.
- Enter a search term (e.g., “milk”) in the input field.
- Click Search.
- Results: Matching tasks from all your lists, separated by Pending and Completed, grouped by list name.
- Use “Clear” to reset.
How to Use: Notes
The “Notes” section (under the “Notes” tab) is a powerful, flexible notepad for jotting down ideas, recipes, thoughts, or any text-based content. It’s like a digital notebook where each note has a title and supports rich formatting (bold, italics, lists, colors, etc.).
Free users can create and share up to 20 notes; Pro users have unlimited access. Notes can also be shared via links (snapshot or live updates). For an overview, see the Smart Notes page.
Accessing the Notes Section
- Log in to your RytePad account and head to the main dashboard.
- In the bottom navigation bar, click the 📚 Notes tab (fifth icon, labeled “Notes”).
- What you’ll see: A simple layout with two main boxes:
- Box 1: “Create a Note Title” input field and “Add Note” button.
- Box 2: “Search & Select Notes…” field — clicking inside opens a dropdown list of note titles.
- Below, an explainer with quick tips. The editor (for content) appears once you select a note.
Creating a New Note
- In Box 1 (“Create a Note Title”), enter a short title (e.g., “Chocolate Cake Recipe” or “Meeting Ideas”).
- Limit: 1–32 characters. No semicolons (;), line breaks, or special symbols beyond basics.
- Click Add Note.
- What happens: A green “Note added. Select below.” message flashes. The note is created, and Box 2 displays a dropdown with the new note title at the top.
- Error checks: If the title exists (case-insensitive), you’ll get an alert.
Example: Type “Travel Bucket List” and click “Add Note.” It’s now ready to select and edit!
Selecting a Note to View or Edit
- In Box 2 (“Search & Select Notes…”), the newly added note title pops out automatically. You can also type part of a note title to search (or click in to see all).
- It filters your notes in a dropdown (sorted by creation date, newest first).
- Click a note title from the dropdown.
- What happens: The note opens below with: title and “Rename Note” button; creation/update dates; a rich-text editor with formatting toolbar (bold, italic, colors, lists, etc.); character count (up to 20,000); and buttons: “Save Content,” “Delete,” “Share.”
- The explainer disappears once a note is selected.
Editing & Formatting Your Note
- With a note selected, click into the editor box (below the title).
- Type or paste your content. Use the toolbar at the top for formatting:
- B (bold), I (italic), U (underline),
S(strikethrough). - Numbered or bulleted lists.
- Text colors (grey, red, blue, green) and yellow background highlight.
- Horizontal line (─) for separators; clear format; undo/redo.
- Spell check toggle (🔤 — turn on for red underlines on errors).
- B (bold), I (italic), U (underline),
- Changes auto-save every 10 seconds, or click Save Content manually.
- What happens: A “💾 Saved” message flashes and the “Updated:” date refreshes.
- Paste tip: Text pastes cleanly — use Ctrl+V (or Cmd+V on Mac).
- Limit: 20,000 characters — watch the counter (turns red if over).
Example: For a recipe note, bold the title, use a bulleted list for ingredients, and add a green checkmark emoji (✅) for steps.
Sharing Your Note
- At the bottom of the open note, click Share.
- Choose one of two options:
- Share – Note Snapshot: Creates a link to the current version (static — doesn’t update if you edit later).
- Share – Live Note: Creates a link that always shows the latest saved content (dynamic).
- Click the option of your choice.
- What happens: A box appears with the link, a “Copy” button, and notes on how it works. If you delete the note, the link stops working.
- Copy the generated link and share it (e.g., via email or social media). Close the box with “Close.”
- The shared link opens a different interface showing the note’s title, the sharer’s name, and the content — view-only, and cannot be edited.
Renaming or Deleting a Note
- Rename: Next to the title, click Rename Note. Edit in the input (same rules: 1–32 chars), then click “Save” (or “Cancel”).
- Delete: Click Delete at the bottom and confirm in the popup (permanent — no recovery).
Searching Your Notes
- Go to the 🔍 Search tab.
- Switch to the “Search Notes” sub-tab.
- Enter a search term (e.g., “chocolate”) in the input.
- Click Search.
- Results: Matching notes with titles and highlighted snippets.
- Use “Clear” to reset.
Countdown Timer
The Countdown Timer helps you stay focused with custom timer settings. On desktops, the timer widget sits at the bottom-right corner of the screen. On smaller-screen devices, access the Countdown Timer from your Dashboard.
Using the Countdown Timer Pro
- Open the timer: In the bottom-right of the screen, click the widget labeled “Set Timer” (⏰).
- Set a timer: Enter the number of minutes (for example, 25 for a Pomodoro) and click “Set Timer.”
- While the timer runs: The widget label changes to “Stop,” and the running timer appears in the top-right corner of the screen.
- When the timer finishes: You’ll hear a beep (repeats for 1 minute) and a popup appears telling you the timer has finished, with two options:
- Stop — stops the alarm and ends the session.
- Set Again — start a new timer immediately.
- Stopping the timer early: Click the “Stop” widget while the timer is running — the timer stops, the top-right timer disappears, and the widget returns to “Set Timer.”
Limits
- Free users: 5 timer credits per day.
- Pro users: Unlimited timer credits.
User Dashboard Overview
The User Dashboard (accessed by clicking your name in the header) is your personal hub for account management, stats, and referrals. View membership details, change your username / password / full name, manage preferences (like timers or auto-copy), and track referrals.
Free users get basic access; Pro users unlock extras like timers and auto-copy. The dashboard has two sub-tabs: User Details (default) and Refer Friends.
Accessing the User Dashboard
In the top header, click your name (e.g., “👤 John (Dashboard)”).
- Membership, username, full name, email, password, timer, newsletters, auto-copy, logout, and stats.
- Referral link, stats, and tables.
Switch sub-tabs by clicking them.
Viewing & Managing Membership Details
- Under “Membership,” see your plan (e.g., “Free” or “Pro”).
- Click Details to expand. You’ll see:
- Start Date: When you joined or upgraded.
- End Date: For Pro (yearly); “Never” for Free.
- Close with the “Close” button.
- Upgrade: If Free, upgrade your account to Pro via the pricing page.
Example: Pro users see “Pro” with dates — great for renewal reminders.
Changing Your Username
- Next to “Username,” click Change (if changes remain — up to 2 total).
- Enter a new username (1–20 chars: letters, numbers, underscores).
- Click Submit (or “Cancel”).
- What happens: Updates if available/valid. Shows remaining changes (e.g., “1 more time(s)”).
- Limit: 2 lifetime changes — after that, the change button disappears.
Your username can be used to log in to RytePad.
Changing Your Full Name
- Next to “Full Name,” click Change.
- Enter your new full name (up to 40 chars: letters, spaces, apostrophes, hyphens, and dots).
- Click Save (or “Cancel”).
- What happens: Updates and reflects in the header (shows first name).
Viewing Email & Changing Password
- Email: Displayed (can’t be changed here — contact support if needed).
- Change Password: Click Change next to “Password.” Enter your old password, a new one (8–25 chars, uppercase / lowercase / number), and confirm. Click Save (or “Cancel”).
Managing Newsletters & Preferences
- Click View Subscriptions next to “Newsletters.”
- Toggle:
- Daily Task Reminders: Email unfinished tasks.
- Inactivity Reminders: Nudges if inactive.
- Pro: Toggle “Auto Copy Tasks Next Day” (copies unfinished daily tasks to the next day).
Logging Out & Viewing Your Stats
Referring Friends (Sub-Tab)
- Switch to Refer Friends.
- Copy your referral link (e.g., “rytepad.com/?ref=yourname”) — append “&tid=something” for tracking.
- View stats: Total/Active referrals, by time frame / TID / country / traffic sources.
- Tables: Last 50 referrals, plus breakdowns.
Note: Rewards are inactive for now, but you can track invites. Share on socials!
↑ Back to topSupport
Our team is always ready to assist you. For quick answers, check the FAQs or visit the Help Center first.
Send us a detailed message about your issue at: [email protected]
Use the contact form on our main website — visit the Contact Us page.
Response time: 12–48 hours.
↑ Back to topReady to get organized?
Tasks, diary, goals, lists and notes — all in one free account.
Sign Up Free →